These special keys open optional passages and areas.

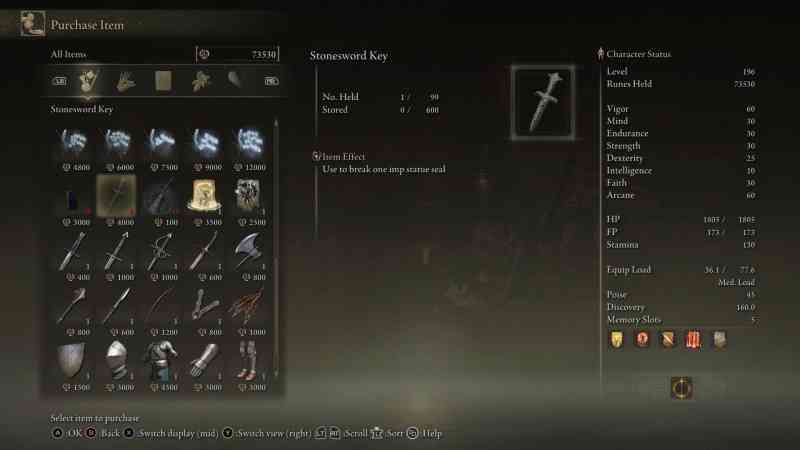
The Stonesword Keys in Elden Ring are special keys that can be used to open optional passages in the environment, unlocking sealed Imp Statues that contain valuable items and rare weapons. In that sense, they’re very similar to the Pharros Lockstones from Dark Souls 2.
You will discover the first of these Stonesword Keys at the end of the Elden Ring tutorial, right next to the Site Of Grace ‘Stranded Graveyard’. Over the course of your adventure, though, you’ll find lots more: in the overworld, in small catacombs and ruins and even in the large Legacy Dungeons.
You must insert a maximum of two Stonesword Keys into the heads of imp statues, after which they’ll get consumed and disappear. You can tell from the imp heads whether one or two keys are required. If there is already a key inside, you only need one. It’s also important not to get them confused with the Imbued Sword Keys, which are a special form of Sword Key used unlock special teleporters at The Four Belfries in West Liurnia.
Here’s where to find Stonesword Keys in Elden Ring.
To see this content please enable targeting cookies.
All Stonesword Key locations in Elden Ring
The below table lists all Stonesword Keys in Elden Ring alongside a handy checklist to help you identify which ones you have and haven’t collected so far. You can also click on any of the locations listed below to be taken to a more detailed overview of where to find that Stonesword Key.
| Stonesword Key | Found? |
|---|---|
| Character Creation | |
| Roundtable Hold #1, #2, and #3, Twin Maiden Husks | |
| Limgrave #1, Fringefolk Hero’s Grave | |
| Limgrave #2, Dragon-Burnt Ruins | |
| Limgrave #3, Murkwater Cave | |
| Limgrave #4, Stormhill Shack | |
| Limgrave #5, Stormveil Castle #1, #2, and #3 | |
| Weeping Peninsula #1, Bridge of Sacrifice | |
| Weeping Peninsula #2, Corpse | |
| Weeping Peninsula #3, Nomadic Merchant | |
| Weeping Peninsula #4, #5, and #6, Isolated Merchant | |
| Weeping Peninsula #7, Castle Morne | |
| Caelid #1, Gaol Cave | |
| Caelid #2, Nomadic Merchant | |
| Caelid #3, Sellia Under-Stair | |
| Caelid #4, West of Fort Faroth | |
| Caelid #5, Divine Tower of Caelid | |
| Caelid #6, Deep Siofra Well | |
| Liurnia #1, Ruins Chest | |
| Liurnia #2, Debate Hall | |
| Liurnia #3, Courtyard | |
| Liurnia #4, #5, and #6, Isolated Merchant | |
| Liurnia #7, Under the Bridge | |
| Liurnia #8, Academy Crystal Cave | |
| Liurnia #9, North of Eastern Tableland | |
| Liurnia #10, Frenzied Flame Village | |
| Liurnia #11, Caria Manor | |
| Altus Plateau #1, Northeast of Grand Lift of Dectus | |
| Altus Plateau #2, Southwest of Rampartside Path | |
| Altus Plateau #3, #4, and #5, Nomadic Merchant | |
| Altus Plateau #6, Shaded Castle | |
| Mt. Gelmir #1, Sage’s Cave | |
| Mt. Gelmir #2, Gelmir Hero’s Grave | |
| Mt. Gelmir #3, Corpse-Stench Shack | |
| Mt. Gelmir #4, Nomadic Merchant | |
| Volcano Manor #1, Fort Laiedd | |
| Volcano Manor #2, Prison Town | |
| Volcano Manor #3, Temple of Eiglay | |
| Leyndell #1, Auriza Hero’s Grave | |
| Leyndell #2, Rooftops | |
| Leyndell #3 and #4, Graveyard | |
| Leyndell #5, Dragon’s Claw | |
| Leyndell #6, West Capital Rampart | |
| Leyndell #7, Sewers | |
| Leyndell #8, Sealed Tunnel | |
| Mountaintops #1, Guardian’s Garrison | |
| Mountaintops #2, #3, and #4 Hermit Merchant | |
| Mountaintops #5, Castle Sol | |
| Consecrated Snowfield #1, Yelough Anix Ruins | |
| Consecrated Snowfield #2, North of Yelough Anix Ruins | |
| Crumbling Farum Azula #1, Dragon Temple Altar | |
| Miquella’s Haligtree #1, Teleporter | |
| Miquella’s Haligtree #2, Branch | |
| Siofra River #1, #2, and #3, Abandoned Merchant | |
| Siofra River #4, Siofra River Bank Bridge | |
| Siofra River #5, Aqueduct-Facing Cliffs | |
| Siofra River #6, Siofra Aqueduct | |
| Ainsel River #1, Nokstella Waterfall Basin | |
| Ainsel River #2, Uhl Palace Ruins | |
| Deeproot Depths #1, Nameless Eternal City | |
| Mohgwyn Dynasty Mausoleum #1, Near Entrance | |
| Mohgwyn Dynasty Mausoleum #2, Near Midpoint | |
| Mohgwyn Dynasty Mausoleum #3, #4, #5, #6, and #7, Isolated Merchant |
Character Creation
When creating the character, you can choose a Stonesword Key as a Keepsake and take it with you as a starting gift.
Roundtable Hold #1, #2, and #3, Twin Maiden Husks
The Twin Maiden Husks have three Stonesword Keys that they sell for 4000 Runes each.

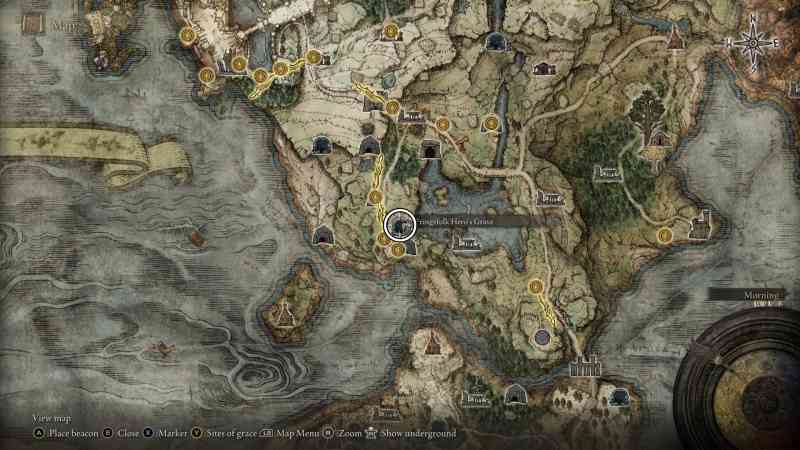
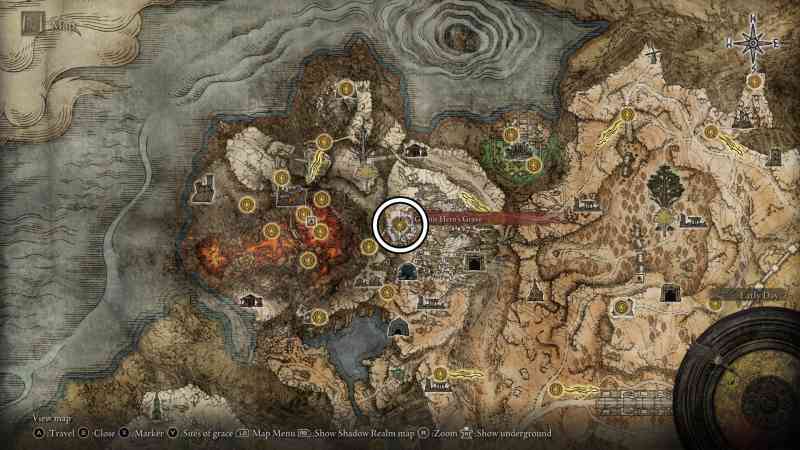
Limgrave #1, Fringefolk Hero’s Grave
You need two Stonesword Keys to access the Fringefolk Hero’s Grave, but you can find it in the Stranded Graveyard. Once inside, follow the section to the bridge where you can drop down the sides, avoiding the Chariot by hiding in alcoves in the wall. Where the path narrows, jump down onto a ledge and get past the imps and fire trap.
Drop down again in the next room with the Grafted Scions and the Erdtree’s Favor Talisman. You will find a Stonesword Key on a balcony overlooking where the section where you met the Chariot earlier on.

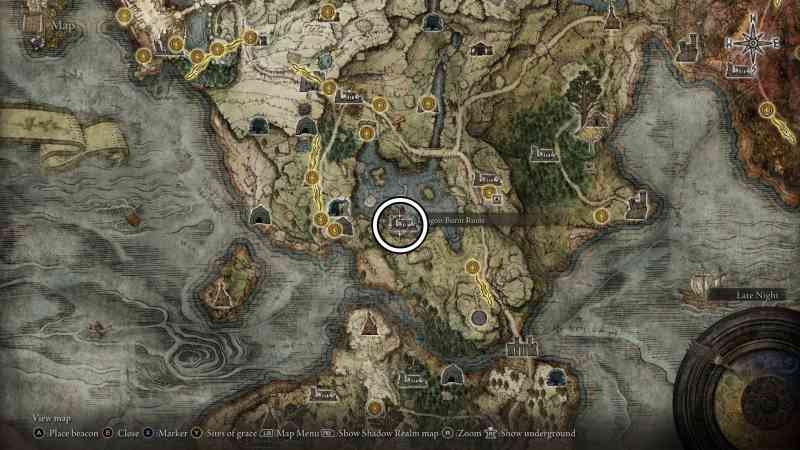
Limgrave #2, Dragon-Burnt Ruins
Right in the starting area in Limgrave, you will discover these ruins next to where the Flying Dragon Agheel has set up camp. The key is in the ruins, in a room with a Giant Rat.

Limgrave #3, Murkwater Cave
In west Limgrave, Murkwater Cave is located halfway between the Dragon-Burnt Ruins and the Murkwater Catacombs. Inside, you will meet Patches. You have to defeat him in a fight and spare him at the end, then he will open his shop. He sells the key for 5000 Runes.


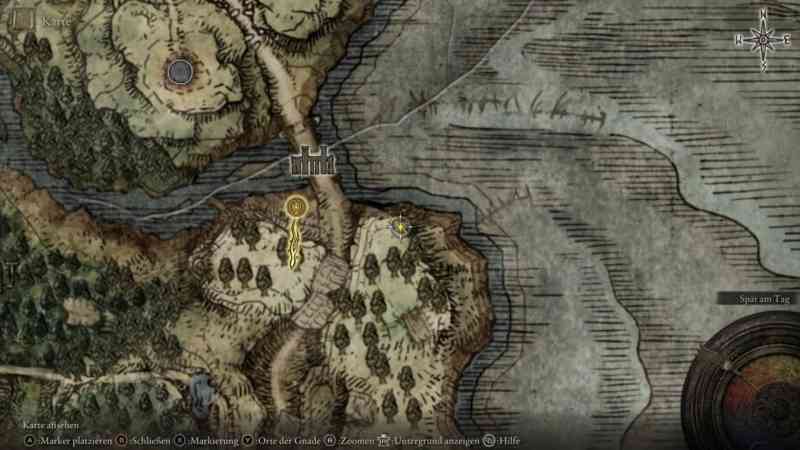
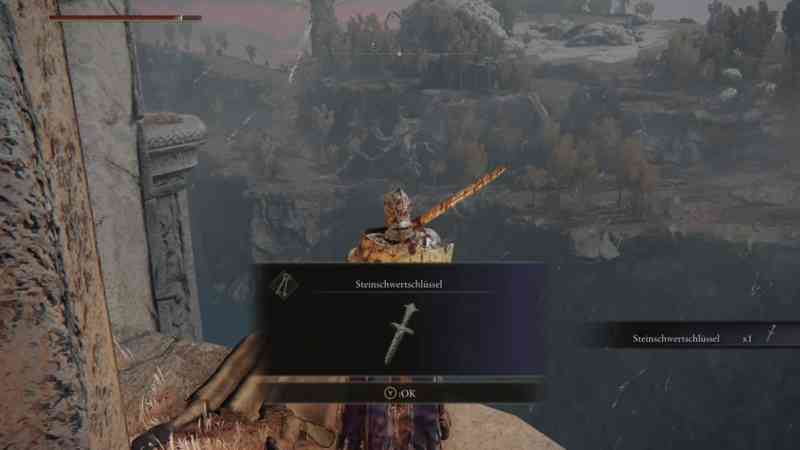
Limgrave #4, Stormhill Shack
On the way to Stormveil Castle, you will pass this shack after the storm gate. The key is by the corpse on the wooden ledge.


Limgrave #5, Stormveil Castle #1, #2, and #3
Follow Sorcerer Rogier’s quest until you find Godwyn’s face in the castle. From the Site of Grace ‘Liftside Chamber’, go out into the courtyard, keep right, drop behind the corpse with the Smithing Stone, and continue down. Kill the Lesser Ulcerated Tree Spirit and you will find the key nearby.
A second Stonesword Key is located in the same room of the castle as the Grafted Scion; this is a dining hall with corpses hanging from the ceiling. On one of the wooden rafters above the Grafted Scion, you can loot this Key from a corpse.
Your third Stonesword Key in Stormveil Castle is located in a small tower along Stormveil Castle’s rooftops, also on a corpse. This is closest to the Rampart Tower Site of Grace.
Weeping Peninsula #1, Bridge of Sacrifice
The Bridge of Sacrifice is the furthest point south in Limgrave and forms the transition to the Weeping Peninsula. The key can be found on the bridge among the soldiers standing guard here.
Weeping Peninsula #2, Corpse
Go to the spot marked on the map below. The key lies by a corpse sitting on a chair in the cliffs, just north of Impaler’s Catacombs.

Weeping Peninsula #3, Nomadic Merchant
A Nomadic Merchant has set up camp on the eastern side of the peninsula at the ‘Castle Morne Rampart’ Site of Grace. He sells a key for 2000 Runes.


Weeping Peninsula #4, #5, and #6, Isolated Merchant
In the southern portion of the west side of the peninsula is the hut of the Isolated Merchant. There are several of these merchants in the game, but this one sells three Stonesword keys for 2000 runes each.


Weeping Peninsula #7, Castle Morne
In Castle Morne, follow the course of the area to the Site Of Grace ‘Behind The Castle’. From there you can drop down several times and land next to a corpse on a wooden scaffold. She has the key with her.
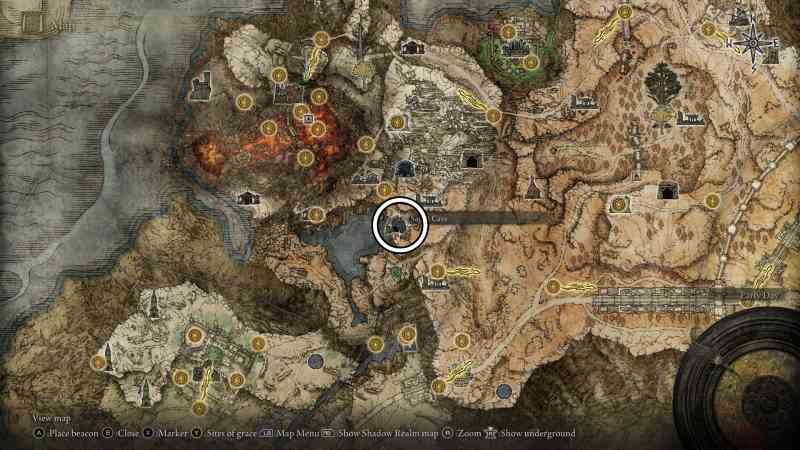
Caelid #1, Gaol Cave
In the Gaol Cave in Caelid (near Fort Gael), follow the path to the lever that opens all the doors in the cave. You will find the key in one of the cells, which will become accessible after you use the aforementioned lever to open them.


Caelid #2, Nomadic Merchant
In southern Caelid, you will meet a Nomadic Merchant along the run between the Sites of Grace called ‘Caelid Highway South’ and ‘Southern Aeonia Swamp Bank’ on the way towards Sellia. He sells a key for 4000 Runes.


Caelid #3, Sellia Under-Stair
In Sellia, Town of Sorcery in Caelid, you can light three candles on three towers. You will find the key on the roofs of the city, on the way to one of the three towers.


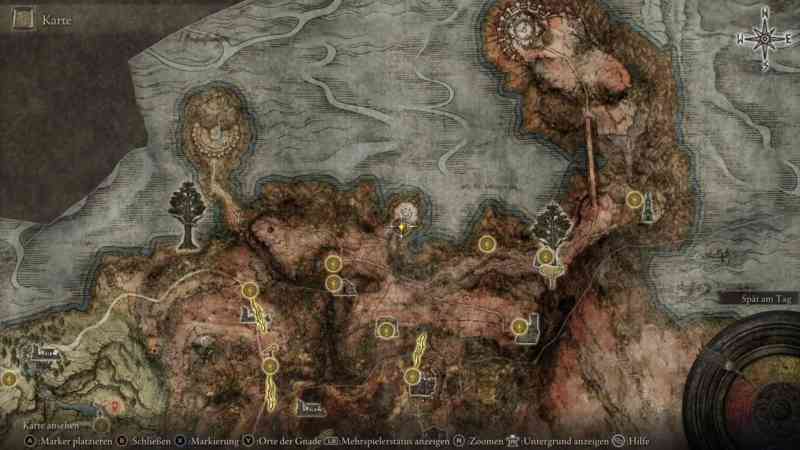
Caelid #4, West of Fort Faroth
In Caelid, between the Sites of Grace ‘Sellia Hideaway’ and ‘Sellia Backstreets’, you will find a very striking structure made of bones shaped like a mountain. Jump to the top here and collect the key from the corpses above.


Caelid #5, Divine Tower of Caelid
At the marked location on the map below is the Divine Tower of Caelid, which you can enter via some overgrown roots. You have to move across the ledges and arches on the outside of the tower, and jump and drop a few times. You’ll find the key by a corpse on the south side.


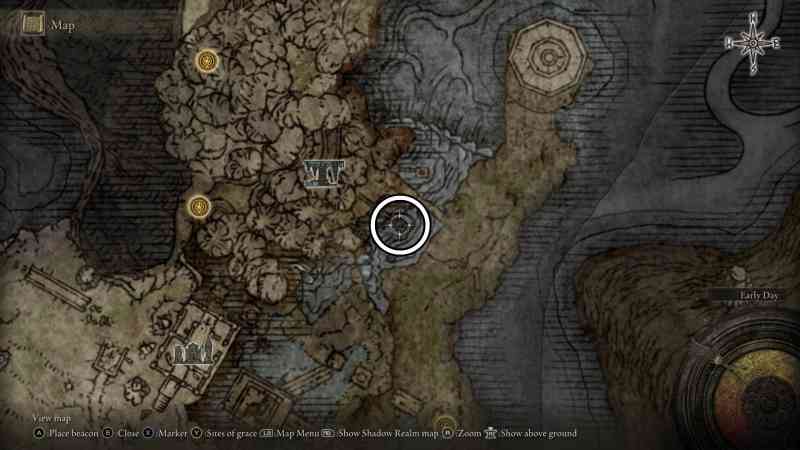
Caelid #6, Deep Siofra Well
For this key, you need to have unlocked the Deep Siofra Well Site of Grace on the Caelid side, via the Siofra Well in Limgrave. Travel down there and you will discover a lift in the north-east part of the underground area. Sacrifice two Stonesword keys and you will come back to the surface in Caelid, where another key lies a little to the south by a bear.

Liurnia #1, Ruins Chest
Among the ruins that lead to Raya Lucaria Academy, you can use Torrent to double-jump onto a ruined tower with a chest containing this key. It is directly east of the South Raya Lucaria Gate Site of Grace.


Liurnia #2, Illusory Bookshelf
Before the boss fog that leads to the Red Wolf of Radagon, you can hit the bookshelf on the left by the stairs. The illusory wall will disappear and open the way to a hidden room where you will not only find the magic ‘Comet’, but also the key.


Liurnia #3, Courtyard
After the fight against the Red Wolf of Radagon, you will come to an area called the Debate Parlor. Go outside into the middle of the Academy’s courtyard to find a fountain, jump into it, and collect the key from a corpse there.
Liurnia #4, #5, and #6, Isolated Merchant
After using the Glintstone Key at the south gate of the Academy of Raya Lucaria, you will find yourself in the Academy grounds. Run through the blue seal (do not click on it). Wolves await you down the path, but behind them is a merchant. He will sell you three Stonesword Keys for 3000 Runes each.


Liurnia #7, Under the Bridge
This key is exterior to the academy, found on a corpse sitting in a chair beneath the bridge on the right-hand side of the area.

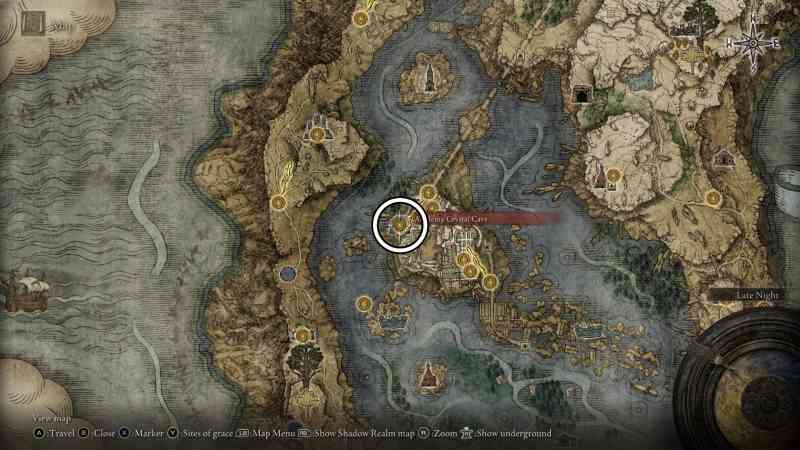
Liurnia #8, Academy Crystal Cave
The Academy Crystal Cave is a small dungeon on the western side of the massive rocky island on which the actual Academy stands. It consists of only a few cave rooms. In one of them you will find a key next to a corpse trapped in a cage.

Liurnia #9, North of Eastern Tableland
From the Eastern Tableland Site of Grace, venture southeast along the path and then head north towards Ainsel River Well once the path splits. If you continue to head north past the well, you’ll arrive at a corpse sitting on a chair holding the key.


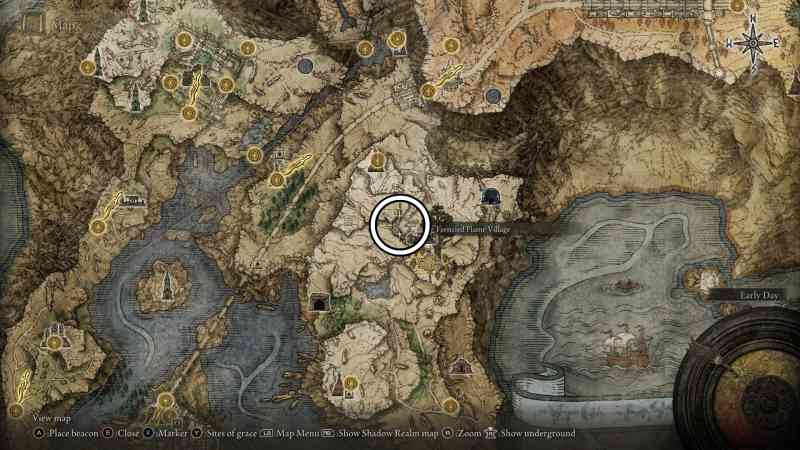
Liurnia #10, Frenzied Flame Village
While exploring the Frenzied Flame Village in northeast Liurnia, venture up the stone ramparts that surround it and you’ll find this key on a corpse.

Liurnia #11, Caria Manor
The final Stonesword Key in Liurnia is found in Caria Manor after you have defeated Royal Knight Loretta, who guards the entrance. In the room above the Manor Lower Level Site of Grace, you’ll find Merchant Pidia. From the top of the ladder that leads to Pidia, drop down to the south and continue along the ramparts until you arrive at this key, which is unfortunately guarded by a Giant Crab.
Altus Plateau #1, Northeast of Grand Lift of Dectus
Your first Altus Plateau Stonesword Key is located a short ride northeast of the Grand Lift of Dectus. If you follow the path out of the Grand Lift, you’ll eventually come to a camp on your right; the key sits on a corpse in this camp.


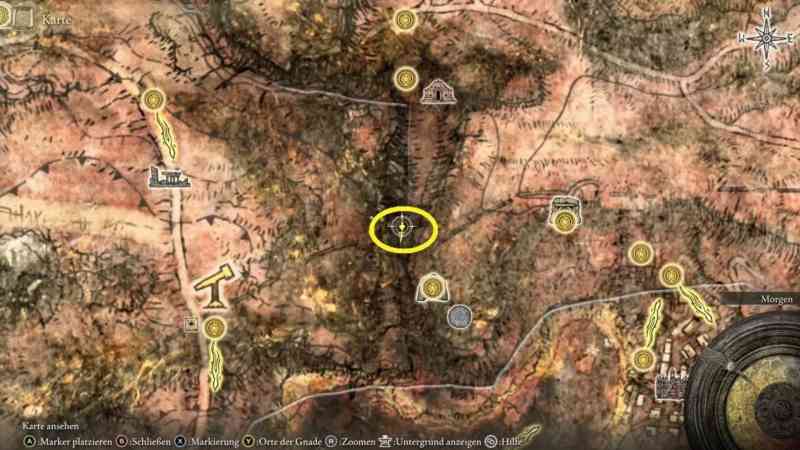
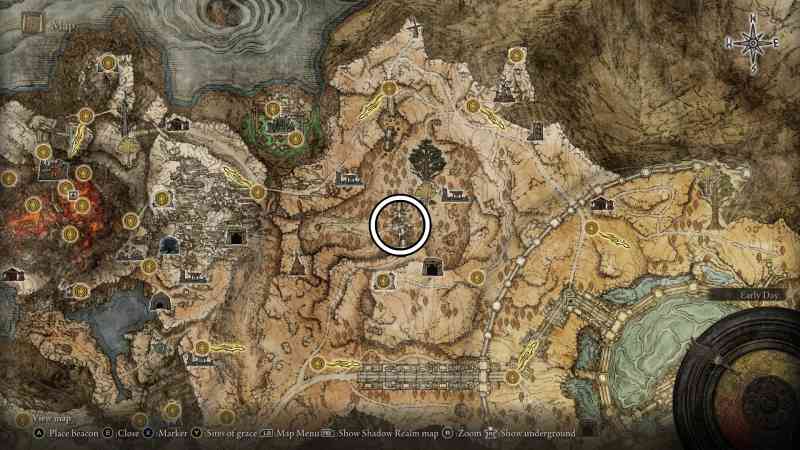
Altus Plateau #2, Southwest of Rampartside Path
On the plateau west of the capital (where the Ancient Dragon Lansseax will also attack), you will find a corpse at the spot marked on the below map.

Altus Plateau #3, #4, and #5, Nomadic Merchant
Just north of the Forest-Spanning Great Bridge Site of Grace, you’ll find a Nomadic Merchant sitting at the end of the bridge. He sells three keys for 4000 Runes each.

Altus Plateau #6, Shaded Castle
Inside of The Shaded Castle which lies in the swamps between Altus Plateau and Mt. Gelmir, you can find another key on a corpse — which hangs off the edge of a rock — in the swamp itself, just north of the Shaded Castle Ramparts Site of Grace.
Mt. Gelmir #1, Sage’s Cave
The Sage’s Cave is full of illusory walls that disappear into thin air after a sword strike. The key lies in a treasure chest behind one of these walls.

Mt. Gelmir #2, Gelmir Hero’s Grave
In Gelmir Hero’s Grave, you will find the key at the top of the ramp with the second Chariot.

Mt. Gelmir #3, Corpse-Stench Shack
This key is halfway between the Site of Grace ‘Bridge of Iniquity’ and the Volcano Manor to the west. The item lies by a corpse on the bridge located just after the invading NPC Anastasia.

Mt. Gelmir #4, Nomadic Merchant
In the northern region of Mt. Gelmir, you’ll find a Nomadic Merchant who will sell you a Stonesword Key for 5000 Runes.

Volcano Manor #1, Fort Laiedd
Near Volcano Manor and north of Fort Laiedd (your closest Grace is Seethewater Terminus), you should see a tree near the cliff-edge that’s surrounded by jellyfish. The key is behind this tree.
Volcano Manor #2, Prison Town
Between the Guest Hall and Prison Town Church Sites of Grace, this key is on a corpse at the bottom of a wooden staircase that you’ll need to access by carefully parkouring down from the rooftops of Prison Town.


Volcano Manor #3, Temple of Eiglay
After defeating the Godskin Noble in Volcano Manor, follow the path until you unlock a lift as a shortcut to the Temple of Eiglay. You can exit this lift during the journey to reach an intermediate floor. The Stonesword Key is located there.
Leyndell #1, Auriza Hero’s Grave
In Auriza Hero’s Grave, you have to run down several slopes and avoid Chariots. There is an alcove in the centre where two Chariots run side by side. You will find the key by the corpse.


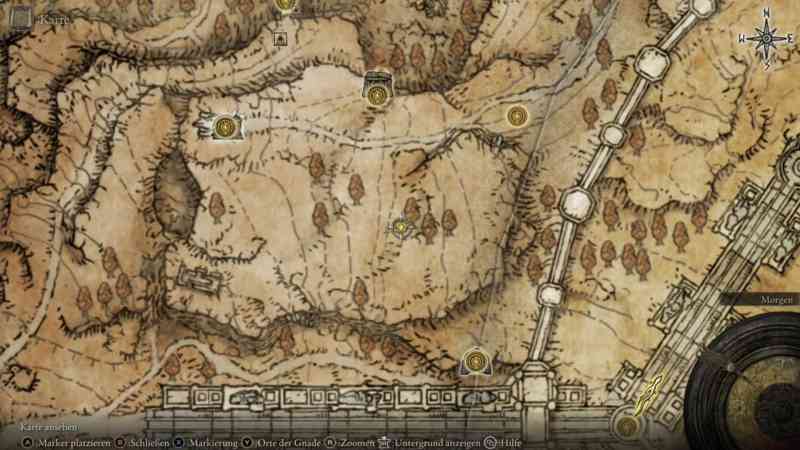
Leyndell #2, Rooftops
As you enter Leyndell and go past East Capital Rampart, jump over the ledge that’s beside three Oracle Envoys so you’re on the rooftops. From here, keep platforming to the north until you find a corpse hanging off the edge of a building next to the stone imps; you can loot this key from his corpse.
Leyndell #3 and #4, Graveyard
Follow the path in Leyndell that leads to a small graveyard where multiple undead are praying; they guard the first key that you’ll find here.
There is another key right next to it in the building with the nearby Leyndell Soldier. It is inside a chest behind the barred door here.


Leyndell #5, Dragon’s Claw
Follow the course behind the Site of Grace ‘West Capital Rampart’ down to the dragon with two knights next to it. Climb onto its claw, jump onto the roof and then into the lookout where you can collect the key.
Leyndell #6, West Capital Rampart
This key lays on a corpse that’s on the roof of a gazebo near the West Capital Rampart.
Leyndell #7, Sewers
In the Subterranaean Shunning Grounds underneath Leyndell, you have to cross some round pipe passages with snails in them. Drop into the first hole at the first snail and you will find the key.
Leyndell #8, Sealed Tunnel
The Sealed Tunnel is located near the Royal Capital of Leyndell, though it’s actually just outside of the city.
Explore the corridors inside the tunnel until you can walk over a massive root. Drop down to the wooden platform in front of a tunnel, kill the two assassins there, and collect the key in the dead end.


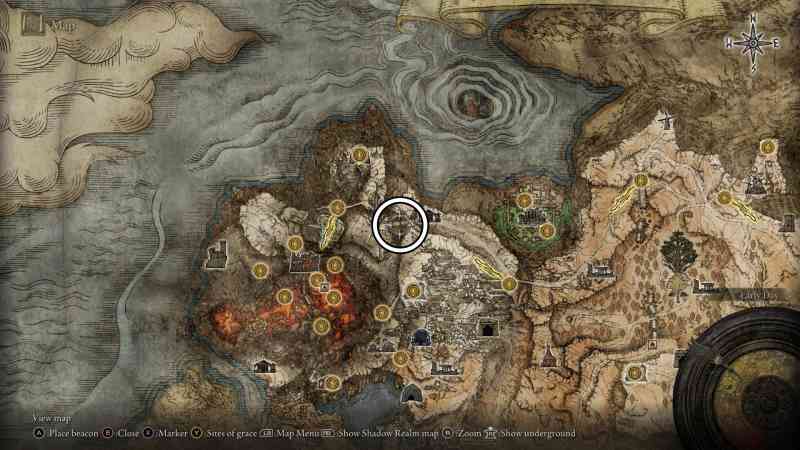
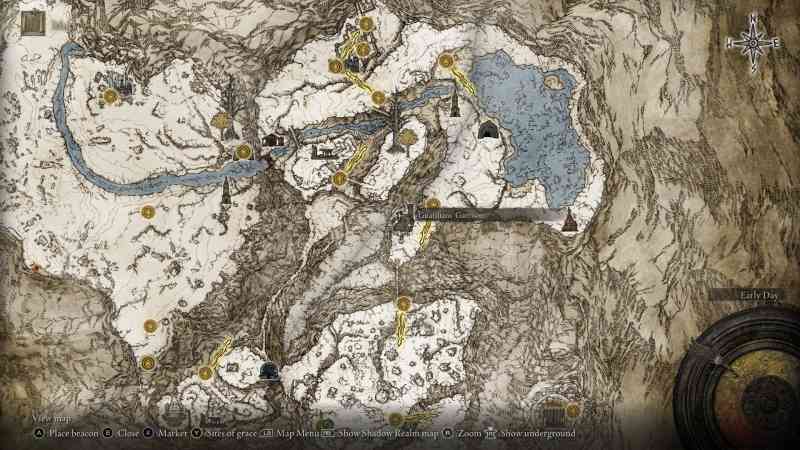
Mountaintops #1, Guardian’s Garrison
Ride a short distance south from the Guardian’s Garrison and you will find the Stonesword Key by a corpse near a Fire Monk.

Mountaintops #2, #3, and #4 Hermit Merchant
Just a short walk south of the Stargazer Ruins (and on the cliffs above the Ancient Snow Valley Ruins), you’ll find a Hermit Merchant who sells three Stonesword Keys for 5000 Runes each.

Mountaintops #5, Castle Sol
In Castle Sol, you will reach the Site of Grace ‘Church of the Eclipse’. In front of this church on the side, you will find a ladder that leads to an area where you will find the key hanging off of a corpse at the very top of the castle .
Consecrated Snowfield #1, Yelough Anix Ruins
In the Yelough Anix Ruins, you will find the key in a ruined tower full of biting rats.


Consecrated Snowfield #2, North of Yelough Anix Ruins
From Yelough Anix Ruins, head in a northwesterly direction and approach the freezing lake on your map. As you do, you should come to a small cliff with a corpse sitting in a chair on it, overlooking the lake; his corpse holds this key.


Crumbling Farum Azula #1, Dragon Temple Altar
Not far from the Site of Grace ‘Dragon Temple’ in the Crumbling Farum Azula, you can explore some rooms. The key lies by a corpse near some pillars.


Miquella’s Haligtree #1, Teleporter
After the start of Miquella’s Haligtree, activate the first Site of Grace and follow the branch southwards to a Stonesword Key.
Miquella’s Haligtree #2, Branch
Also in the canopy of Miquella’s Haligtree, you’ll find the second key to the right of the Giant Miranda Sprouts, on a narrower branch that leads directly south past a small envoy to a corpse with the Stonesword Key.
Siofra River #1, #2, and #3, Abandoned Merchant
An Abandoned Merchant in the Siofra River will sell you three keys for 2000 Runes each. To find them, you must walk south-west from the Site of Grace ‘Worshippers’ Woods’ and reach a wooden scaffold that can be climbed using the stairs and ladders.

At the top, jump right to a platform below you and follow the path behind the waterfall into the ruins where the merchant has set up camp.

Siofra River #4, Siofra River Bank Bridge
From the Siofra River Bank Site of Grace, go northwest along the grand walkway here and take the first right onto a broken bridge. The key lies on a corpse at the very end of this bridge.

Siofra River #5, Aqueduct-Facing Cliffs
In Nokron Eternal City, travel to the Aqueduct-Facing Cliffs Site of Grace and head southwest along the narrow path here until you reach some jellyfish. Here, you can drop down to a lower ledge to find this key.
Siofra River #6, Siofra Aqueduct
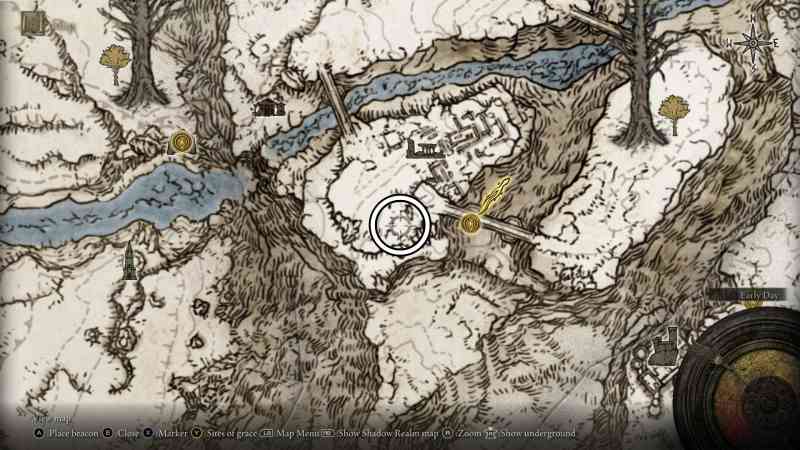
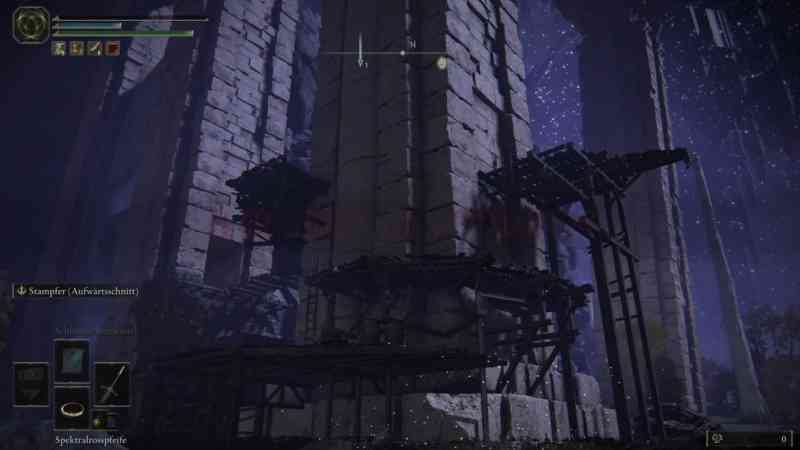
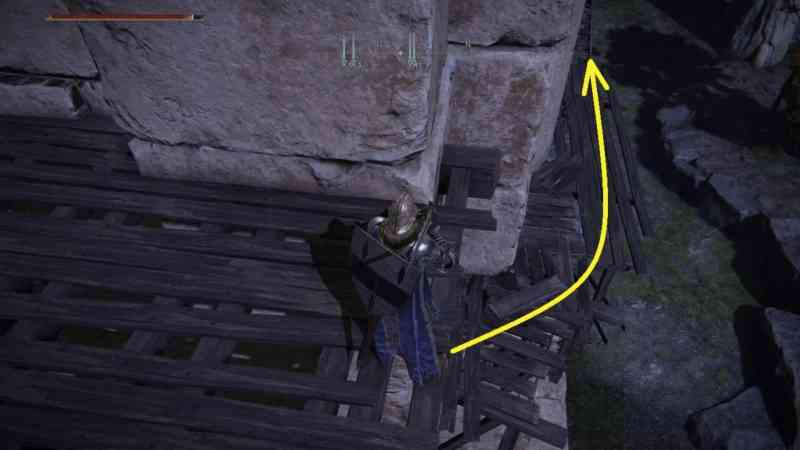
From the Worshipper’s Woods Site of Grace, head northwest towards Siofra Aqueduct. If you keep northwest, you’ll eventually come to a Golden Seed and just ahead of it and on your left is a wall brace you can carefully walk down. You’ll then need to use Torrent to parkour over to the ledge that holds this key.

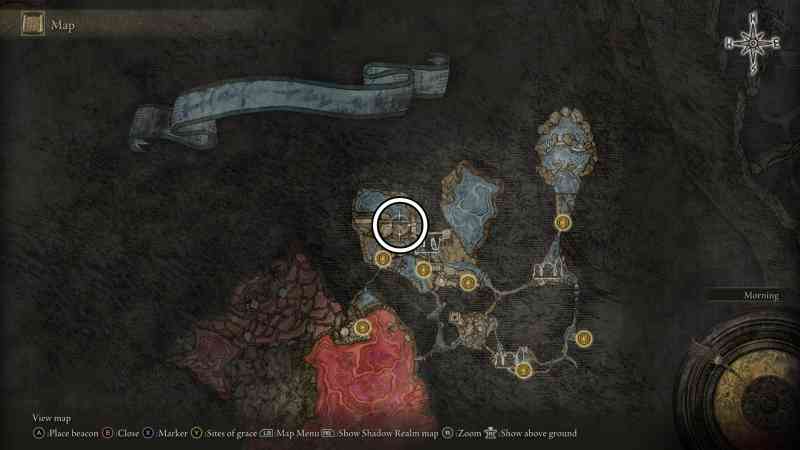
Ainsel River #1, Nokstella Waterfall Basin
In Nokstella Eternal City, follow the course of the water in a westerly direction. At the very end, you will see an area with three giant ants on the right. You will find the key on a corpse on the cliffs to the left.

Ainsel River #2, Uhl Palace Ruins
In Ainsel River Main, follow the course after the starting point until you reach a skeletal dragonfly monster with grasping pincers (Malformed Stars) in the northern portion of the Uhl Palace Ruins. To the left of it lies a corpse by a giant flower.


Deeproot Depths #1, Nameless Eternal City
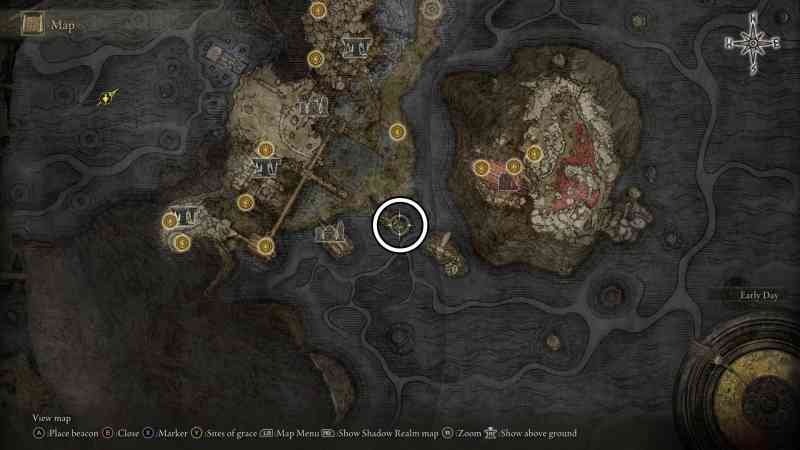
In the Deeproot Depths, which you access as part of Fia’s quest, travel to the Nameless Eternal City Site of Grace which is in the far northwest of the area. From here, go west along the river to your north to reach a Spiritspring; use this to reach the roof of the church, where you can find this key.


Mohgwyn Dynasty Mausoleum #1, Near Entrance
In Mohgwyn Palace, you will find the key in the south of the area on a corpse by the lake of blood, very close to the disgusting giant birds that hang around there.
Mohgwyn Dynasty Mausoleum #2, Near Midpoint
In the Mohgwyn Dynasty Mausoleum still, follow the path upwards past the many undead. Keep your eyes to the right and you will see a group of them praying. In the centre of them lies this key.
Mohgwyn Dynasty Mausoleum #3, #4, #5, #6, and #7, Isolated Merchant
A little further on in the area, you will pass through the actual mausoleum. In a corridor on the left — behind a Sanguine Noble — sits an Imprisoned Merchant selling five Stonesword Keys for 5000 Runes each..
All Stonesword Key locations at a glance in Elden Ring
The below map embed (which is thanks to our friends over at MapGenie) features the locations of all the Stonesword Keys detailed above to help you with quickly grabbing them:
To see this content please enable targeting cookies.
That’s it for now! We hope you enjoy hunting for Stonesword Keys in Elden Ring.
Need more help? Jump back to our list of Elden Ring bosses or our Elden Ring walkthrough.